[salesforce][chatter] Chatter in Apexで楽々?Chatterカスタマイズ開発
単純に「Chatterの見た目をブランディングしたい」とか「独自のChatter関連機能を追加したい」など、Chatterをカスタム開発する方法は以下が考えられます(あくまでSalesforce内の話です)
- VisualforceのChatterタグを利用して開発
- Chatterの各種トリガ開発
- VisualforceでAjaxToolkitを使って開発
- ApexでSOQLを駆使して開発
上から実現できることが少ない順に書き出してみましたが、どの方法でも実現できない事があります。それは「メンション投稿」と「コメントのいいね!取得」です。
「開発した画面ではメンション投稿できないのでメンションする場合は標準のChatterタブでお願いします」という運用が通じない場合はメンション投稿機能は必須要件となってしまいます。
これを実現するために以前は「ApexからCalloutでREST APIを叩く」という実装をしていましたが、HTTP Requestを記述したりJSONをパースしなければならない少々苦しい実装でした。
そこで、そういう面倒な部分を回避できる便利な機能として「Chatter in Apex」がSummer’13より正式リリースされました(pilot版では「Connect in Apex」と呼ばれていた機能です)
以下、単純にNewsFeedを表示して「投稿」ボタンでテスト投稿するサンプルです。メンション投稿とコメントのいいね!が取得できていることが確認できます。
Visualforce
[html]
<apex:page controller="ChatterInApexController">
<apex:form >
<apex:selectList value="{!communityId}" size="1">
<apex:selectOptions value="{!communityOptions}"/>
<apex:actionSupport event="onchange" rerender="feed"/>
</apex:selectList>
<apex:commandButton value="投稿" action="{!postFeed}" />
</apex:form>
<apex:outputPanel id="feed">
<apex:repeat value="{!newsFeedItems}" var="feedItem">
<div>
<apex:image style="margin:4px" width="25" url="{!feedItem.photoUrl}"/><br/>
User: <b>{!feedItem.actor.name}</b><br/>
Text: <b>{!feedItem.body.text}</b><br/>
Likes: <b>{!feedItem.likes.total}
[
<apex:repeat value="{!feedItem.likes.likes}" var="like">
{!like.user.lastName} {!like.user.FirstName},
</apex:repeat>
]
</b><br/>
<apex:outputPanel >
<apex:repeat value="{!feedItem.comments.comments}" var="comment">
<div style="margin-left:25px">
<apex:image style="margin:4px" width="25" url="{!comment.user.photo.smallPhotoUrl}"/><br/>
User: <b>{!comment.user.name}</b><br/>
Text: <b>{!comment.body.text}</b><br/>
Likes: <b>{!comment.likes.total}
[
<apex:repeat value="{!comment.likes.likes}" var="like">
{!like.user.lastName} {!like.user.FirstName},
</apex:repeat>
]</b>
</div>
</apex:repeat>
</apex:outputPanel>
</div>
</apex:repeat>
</apex:outputPanel>
</apex:page>
[/html]
Apex
[html]
public class ChatterInApexController{
public String communityId {
get;
set {
if (value == ”) {
communityId = null;
} else {
communityId = value;
}
}
}
public static List<SelectOption> getCommunityOptions() {
List<SelectOption> options = new List<SelectOption>();
options.add(new SelectOption(”, ‘Internal’));
ConnectApi.CommunityPage communityPage = ConnectApi.Communities.getCommunities(ConnectApi.CommunityStatus.Live);
for (ConnectApi.Community community : communityPage.communities) {
options.add(new SelectOption(community.id, community.name));
}
return options;
}
public List<ConnectApi.FeedItem> getNewsFeedItems() {
return ConnectApi.ChatterFeeds.getFeedItemsFromFeed(communityId, ConnectApi.FeedType.News, ‘me’).items;
}
public PageReference postFeed() {
ConnectApi.MessageBodyInput messageInput = new ConnectApi.MessageBodyInput();
messageInput.messageSegments = new List<ConnectApi.MessageSegmentInput>();
ConnectApi.TextSegmentInput textSegment = new ConnectApi.TextSegmentInput();
ConnectApi.MentionSegmentInput mentionSegment = new ConnectApi.MentionSegmentInput();
ConnectApi.FeedItemInput input = new ConnectApi.FeedItemInput();
mentionSegment.id = ‘XXXXXXXXXXXXXXX’;
messageInput.messageSegments.add(mentionSegment);
textSegment.text = ‘test’;
messageInput.messageSegments.add(textSegment);
input.body = messageInput;
ConnectApi.ChatterFeeds.postFeedItem(communityId, ConnectApi.FeedType.News, ‘me’, Input, null);
return null;
}
public PageReference choose() {
return null;
}
}
[/html]
Salesforce Communitiesもリリースされましたので冒頭communityIdの管理が必要になります。
NewsFeedの取得はConnectApi.ChatterFeeds.getFeedItemsFromFeedメソッドでごっそり取得できますので殆どページ側で操作可能です。
ポストはConnectApi.MessageBodyInput.messageSegmentsリストへ本文の断片をaddしていきます。これはメンションが文頭や文中、文末のどこに幾つあっても対応できるようにするためでしょう(メンションのためだけではないと思いますが…)
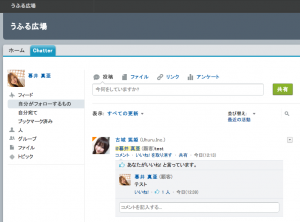
これで以下のようにメンション投稿されました(わかりやすく標準画面を掲載)
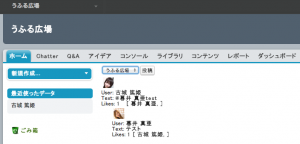
また、以下のようにVisualforce画面でコメントのいいね!が表示されました。
おまけ: 実はForceTKもVisualforceで利用できるっぽいのでJavascriptだけでも出来るかもしれません。

