[GCE][DevOps][Docker] Google Compute EngineでDockerを試す
今年はImmutable Infrastructureの年だそうです。PaaSしか使わない人にはあまり関係ないかもしれませんが、IaaSからインフラを構築してサービスを提供するような場合は興味深い分野ではあります。
このImmutable Infrastructureを具体的に実現するツールとしてDockerが上げられます。Dockerについては仮想環境構築に docker を使うが詳しいです。端的に言うと以下のような感じですかね。
- コンテナという概念で仮想環境を構築可能
- コンテナの雛形から瞬時にコンテナを作成可能
- アプリをコンテナ単位で隔離することが可能
- ホストOSは物理環境か仮想環境かは問わない
- Dockerfileで構築手順をコード定義可能
- コンテナをリポジトリにプッシュすることで共有
どんな用途が考えられるのかは開発現場で Docker をどこで使うか考えてみたのような感じです。
このDockerはGoogle Compute Engineの正式サービス開始と同時に当サービスでサポートされるなど注目されています。…こういうものは多分、実際触った方が解りやすいと思いますので早速試します。
Google Compute EngineでDockerを利用する方法はDockerのドキュメントに掲載されてますので今回はこちらの手順でやってみます。
まずGoogle Cloud PlatformのSDKをこちらからインストールします。
次にGoogle Cloud Platformに一つプロジェクトを作っておきます(この辺りは割愛させていただきますがGoogle Compute Engineを試すにはクレジットカードの設定が必須ですのでお気をつけください)
作成したプロジェクトでコマンドツールを利用するためには最初だけ認証作業が必要になります。以下のようにするとブラウザでOAuth認証が開きます。
[html]
$ gcloud config set account <your-gmail>
$ gcloud auth login
[/html]
ブラウザ認証が終わるとプロジェクトIDの入力を求められます。
[html]
Your browser has been opened to visit:
https://accounts.google.com/o/oauth2/auth?scope=…
You can list your projects and create new ones in the Google Cloud console at https://cloud.google.com/console. If you have a project ready, you can enter it now.
Enter a cloud project id (or leave blank to not set): <your-project-id>
You are logged in as ***@gmail.com.
[/html]
あとはインスタンスの作成からDockerのインストール/スタートまでこちらのドキュメント通りのコマンドを叩けばインストールできます。
ではGoogle Compute EngineでDockerを試してみましょう。
まず既にDockerのコンテナの雛形はこちらでインターネット上に公開/共有されてますので例えばlamp環境の雛形を落として使ってみます。
[html]
$ sudo docker run -d mbkan/lamp
Unable to find image ‘mbkan/lamp’ (tag: latest) locally
Pulling repository mbkan/lamp
2b73ad3c822d: Download complete
0a36ba01d577: Download complete
3181b5c746fa58b3481ea53f482762887e2efd89812f41d704ad992a96c5dcfc
[/html]
これでこちらのリポジトリからLAMP環境の雛形をダウンロードして起動まで一気にやってくれます。最後に吐かれた「3181b5c746fa58b3481ea53f482762887e2efd89812f41d704ad992a96c5dcfc」は作成されたコンテナのIDです。
コンテナの起動確認は以下のようにプロセス確認のようにします。
[html]
$ sudo docker ps
CONTAINER ID IMAGE COMMAND CREATED STATUS PORTS NAMES
3181b5c746fa mbkan/lamp:latest /bin/sh /init 54 seconds ago Up 53 seconds 22/tcp, 443/tcp, 80/tcp grave_babbage
[/html]
先ほど吐かれたコンテナIDの一部が表示されています。それでは、もうひとつ同じ雛形から違うコンテナを走らせてみます。
[html]
$ sudo docker run -i -t -d mbkan/lamp /bin/bash
249790223ebb681c6ca6d625a66427f7fdea68f7cd1001cc6486f6aa60fbf2d3
[/html]
当たり前ですが、また別のコンテナIDが表示されました。では再度プロセスを確認してみましょう。
[html]
$ sudo docker ps
CONTAINER ID IMAGE COMMAND CREATED STATUS PORTS NAMES
249790223ebb mbkan/lamp:latest /bin/bash 3 seconds ago Up 3 seconds 22/tcp, 443/tcp, 80/tcp sick_newton
3181b5c746fa mbkan/lamp:latest /bin/sh /init About a minute ago Up About a minute 22/tcp, 443/tcp, 80/tcp grave_babbage
[/html]
先ほど作成した2つのコンテナが稼働してます。これはバックグラウンドで稼働していることを表しています。それではプロセスをkillします。
[html]
$ sudo docker kill 249790223ebb
249790223ebb
$ sudo docker kill 3181b5c746fa
3181b5c746fa
$ sudo docker ps
CONTAINER ID IMAGE COMMAND CREATED STATUS PORTS NAMES
[/html]
現在稼働中のコンテナはなくなりました。ただ実はスナップショットのような状態で残っていて実体は/var/lib/docker/containers/に存在します。psで-aをつけて停止したプロセスも含めて表示しても確認可能です。
[html]
$sudo ls /var/lib/docker/containers/
192185e8855ba750cbfa3419d9f80642e802da910478ba81de45d7e710f1dfb1
249790223ebb681c6ca6d625a66427f7fdea68f7cd1001cc6486f6aa60fbf2d3
3181b5c746fa58b3481ea53f482762887e2efd89812f41d704ad992a96c5dcfc
$ sudo docker ps -a -notrunc
CONTAINER ID IMAGE COMMAND CREATED STATUS PORTS NAMES
249790223ebb681c6ca6d625a66427f7fdea68f7cd1001cc6486f6aa60fbf2d3 mbkan/lamp:latest /bin/bash 19 minutes ago Exit 0 sick_newton
3181b5c746fa58b3481ea53f482762887e2efd89812f41d704ad992a96c5dcfc mbkan/lamp:latest /bin/sh /init 20 minutes ago Exit 0 grave_babbage
192185e8855ba750cbfa3419d9f80642e802da910478ba81de45d7e710f1dfb1 busybox:latest echo docker on GCE \o/ About an hour ago Exit 0 distracted_bohr
[/html]
ではコンテナを再起動してみます。
[html]
$ sudo docker start 249790223ebb681c6ca6d625a66427f7fdea68f7cd1001cc6486f6aa60fbf2d3
249790223ebb681c6ca6d625a66427f7fdea68f7cd1001cc6486f6aa60fbf2d3
$ sudo docker ps
CONTAINER ID IMAGE COMMAND CREATED STATUS PORTS NAMES
249790223ebb mbkan/lamp:latest /bin/bash 27 minutes ago Up 24 seconds 22/tcp, 443/tcp, 80/tcp sick_newton
[/html]
もちろんstopやrestartもできます。
[html]
$ sudo docker stop 249790223ebb
$ sudo docker restart 249790223ebb
[/html]
起動中のコンテナに接続して操作するにはattachを使います。
[html]
$ sudo docker attach 249790223ebb
ls
bin boot dev etc home init lib lib64 media mnt opt proc root sbin selinux srv sys tmp usr var
bash-4.1#
[/html]
ではMySQLやApacheを起動してみます。
[html]
bash-4.1# /etc/init.d/mysqld start
Starting mysqld: [ OK ]
bash-4.1# /etc/init.d/httpd status
httpd dead but pid file exists
bash-4.1# /etc/rc.d/init.d/httpd start
Starting httpd: httpd: Could not reliably determine the server’s fully qualified domain name, using 172.17.0.13 for ServerName
[ OK ]
[/html]
コンテナの接続を終了してcurlでアクセスしてみます。exitで抜けてしまうとコンテナが停止しますのでCntl-p→Cntl-qとすることでコンテナを停止せずにコンテナとの接続を終了できます。
curlでアクセスする前にIPアドレスがわかりませんので調べます。以下のようにするとコンテナの情報が表示されます。
[html]
$ sudo docker inspect 249790223ebb
[{
"ID": "249790223ebb681c6ca6d625a66427f7fdea68f7cd1001cc6486f6aa60fbf2d3",
"Created": "2014-01-15T06:29:13.871039281Z",
"Path": "/bin/bash",
"Args": [],
"Config": {
"Hostname": "249790223ebb",
"Domainname": "",
"User": "",
"Memory": 0,
"MemorySwap": 0,
"CpuShares": 0,
"AttachStdin": false,
"AttachStdout": false,
"AttachStderr": false,
"PortSpecs": null,
"ExposedPorts": {
"22/tcp": {},
"443/tcp": {},
"80/tcp": {}
},
"Tty": true,
"OpenStdin": true,
"StdinOnce": false,
"Env": null,
"Cmd": [
"/bin/bash"
],
"Dns": null,
"Image": "mbkan/lamp",
"Volumes": null,
"VolumesFrom": "",
"WorkingDir": "",
"Entrypoint": null,
"NetworkDisabled": false
},
"State": {
"Running": true,
"Pid": 5887,
"ExitCode": 0,
"StartedAt": "2014-01-15T07:22:20.492485933Z",
"FinishedAt": "2014-01-15T07:22:01.828186345Z",
"Ghost": false
},
"Image": "2b73ad3c822de76e8845b4b19e352cbe91e42dca118cf6e4229be2feab801b11",
"NetworkSettings": {
"IPAddress": "172.17.0.13",
"IPPrefixLen": 16,
"Gateway": "172.17.42.1",
"Bridge": "docker0",
"PortMapping": null,
"Ports": {
"22/tcp": null,
"443/tcp": null,
"80/tcp": null
}
},
"ResolvConfPath": "/etc/resolv.conf",
"HostnamePath": "/var/lib/docker/containers/249790223ebb681c6ca6d625a66427f7fdea68f7cd1001cc6486f6aa60fbf2d3/hostname",
"HostsPath": "/var/lib/docker/containers/249790223ebb681c6ca6d625a66427f7fdea68f7cd1001cc6486f6aa60fbf2d3/hosts",
"Name": "/sick_newton",
"Driver": "aufs",
"Volumes": {},
"VolumesRW": {},
"HostConfig": {
"Binds": null,
"ContainerIDFile": "",
"LxcConf": [],
"Privileged": false,
"PortBindings": {
"22/tcp": null,
"443/tcp": null,
"80/tcp": null
},
"Links": null,
"PublishAllPorts": false
}
}]
[/html]
IPアドレスは172.17.0.13みたいなので以下のようにアクセスしてみました。
[html]
$ curl 172.17.0.13
<!DOCTYPE html PUBLIC "-//W3C//DTD XHTML 1.1//EN" "http://www.w3.org/TR/xhtml11/DTD/xhtml11.dtd">
<head>
<title>Apache HTTP Server Test Page powered by CentOS</title>
<meta http-equiv="Content-Type" content="text/html; charset=UTF-8" />
<style type="text/css">
body {
background-color: #fff;
color: #000;
font-size: 0.9em;
font-family: sans-serif,helvetica;
margin: 0;
padding: 0;
}
:link {
color: #0000FF;
}
:visited {
color: #0000FF;
}
a:hover {
color: #3399FF;
}
h1 {
text-align: center;
margin: 0;
padding: 0.6em 2em 0.4em;
background-color: #3399FF;
color: #ffffff;
font-weight: normal;
font-size: 1.75em;
border-bottom: 2px solid #000;
}
h1 strong {
font-weight: bold;
}
h2 {
font-size: 1.1em;
font-weight: bold;
}
.content {
padding: 1em 5em;
}
.content-columns {
/* Setting relative positioning allows for
absolute positioning for sub-classes */
position: relative;
padding-top: 1em;
}
.content-column-left {
/* Value for IE/Win; will be overwritten for other browsers */
width: 47%;
padding-right: 3%;
float: left;
padding-bottom: 2em;
}
.content-column-right {
/* Values for IE/Win; will be overwritten for other browsers */
width: 47%;
padding-left: 3%;
float: left;
padding-bottom: 2em;
}
.content-columns>.content-column-left, .content-columns>.content-column-right {
/* Non-IE/Win */
}
img {
border: 2px solid #fff;
padding: 2px;
margin: 2px;
}
a:hover img {
border: 2px solid #3399FF;
}
</style>
</head>
<body>
<h1>Apache 2 Test Page<br><font size="-1"><strong>powered by</font> CentOS</strong></h1>
<div class="content">
<div class="content-middle">
<p>This page is used to test the proper operation of the Apache HTTP server after it has been installed. If you can read this page it means that the Apache HTTP server installed at this site is working properly.</p>
</div>
<hr />
<div class="content-columns">
<div class="content-column-left">
<h2>If you are a member of the general public:</h2>
<p>The fact that you are seeing this page indicates that the website you just visited is either experiencing problems or is undergoing routine maintenance.</p>
<p>If you would like to let the administrators of this website know that you’ve seen this page instead of the page you expected, you should send them e-mail. In general, mail sent to the name "webmaster" and directed to the website’s domain should reach the appropriate person.</p>
<p>For example, if you experienced problems while visiting www.example.com, you should send e-mail to "webmaster@example.com".</p>
</div>
<div class="content-column-right">
<h2>If you are the website administrator:</h2>
<p>You may now add content to the directory <tt>/var/www/html/</tt>. Note that until you do so, people visiting your website will see this page and not your content. To prevent this page from ever being used, follow the instructions in the file <tt>/etc/httpd/conf.d/welcome.conf</tt>.</p>
<p>You are free to use the images below on Apache and CentOS Linux powered HTTP servers. Thanks for using Apache and CentOS!</p>
<p><a href="http://httpd.apache.org/"><img src="/icons/apache_pb.gif" alt="[ Powered by Apache ]"/></a> <a href="http://www.centos.org/"><img src="/icons/poweredby.png" alt="[ Powered by CentOS Linux ]" width="88" height="31" /></a></p>
</div>
</div>
</div>
<div class="content">
<div class="content-middle"><h2>About CentOS:</h2><b>The Community ENTerprise Operating System</b> (CentOS) is an Enterprise-class Linux Distribution derived from sources freely provided to the public by a prominent North American Enterprise Linux vendor. CentOS conforms fully with the upstream vendors redistribution policy and aims to be 100% binary compatible. (CentOS mainly changes packages to remove upstream vendor branding and artwork.) The CentOS Project is the organization that builds CentOS.</p>
<p>For information on CentOS please visit the <a href="http://www.centos.org/">CentOS website</a>.</p>
<p><h2>Note:</h2><p>CentOS is an Operating System and it is used to power this website; however, the webserver is owned by the domain owner and not the CentOS Project. <b>If you have issues with the content of this site, contact the owner of the domain, not the CentOS project.</b>
<p>Unless this server is on the CentOS.org domain, the CentOS Project doesn’t have anything to do with the content on this webserver or any e-mails that directed you to this site.</p>
<p>For example, if this website is www.example.com, you would find the owner of the example.com domain at the following WHOIS server:</p>
<p><a href="http://www.internic.net/whois.html">http://www.internic.net/whois.html</a></p>
</div>
</div>
</body>
</html>
[/html]
ちゃんと動いてます。ただ、これをインターネット上に公開するにはどうすれば良いのでしょうか?
調べてみるとポートフォワーディングするようです。Google Compute EngineのVMの80番ポートへのアクセスをコンテナの80番へ行くようにするにはコンテナ作成時に設定しておかなければいけなかったようです。
以下のようにポート80をフォワーディングした形でコンテナを作成してMySQLとApacheを起動します。
[html]
$ sudo docker run -i -t -d -p 80:80 mbkan/lamp /bin/bash
ebd2411fa1a3e16ddd7e3f86faf1da8d2a0d6bd1afce0f18214ec76b9c047246
$ sudo docker ps
CONTAINER ID IMAGE COMMAND CREATED STATUS PORTS NAMES
ebd2411fa1a3 mbkan/lamp:latest /bin/bash 21 seconds ago Up 21 seconds 0.0.0.0:80->80/tcp, 22/tcp, 443/tcp elegant_engelbart
$ sudo docker attach ebd2411fa1a3
/etc/rc.d/init.d/httpd start
Starting httpd: httpd: Could not reliably determine the server’s fully qualified domain name, using 172.17.0.14 for ServerName
[ OK ]
bash-4.1# /etc/init.d/mysqld start
Starting mysqld: [ OK ]
[/html]
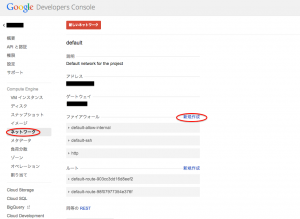
これでインターネット上からアクセスできるはずですがGoogle Compute EngineのVMのファイアーウォールの設定を忘れてましたので以下の画像画面で「新規作成」リンクからhttpの設定を追加します。
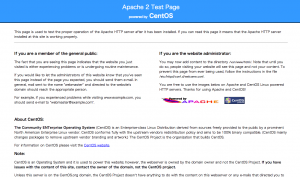
これでコンテナのWebページが表示されました!
ちょっと長くなりすぎましたので今回はこのくらいにしますが、コンテナから雛形を作成してリポジトリを介して共有することもできますので、この辺りはまた機会があれば試してみます。

